Mockups and photos
The Mockup Studio, start to finish
7 minute read
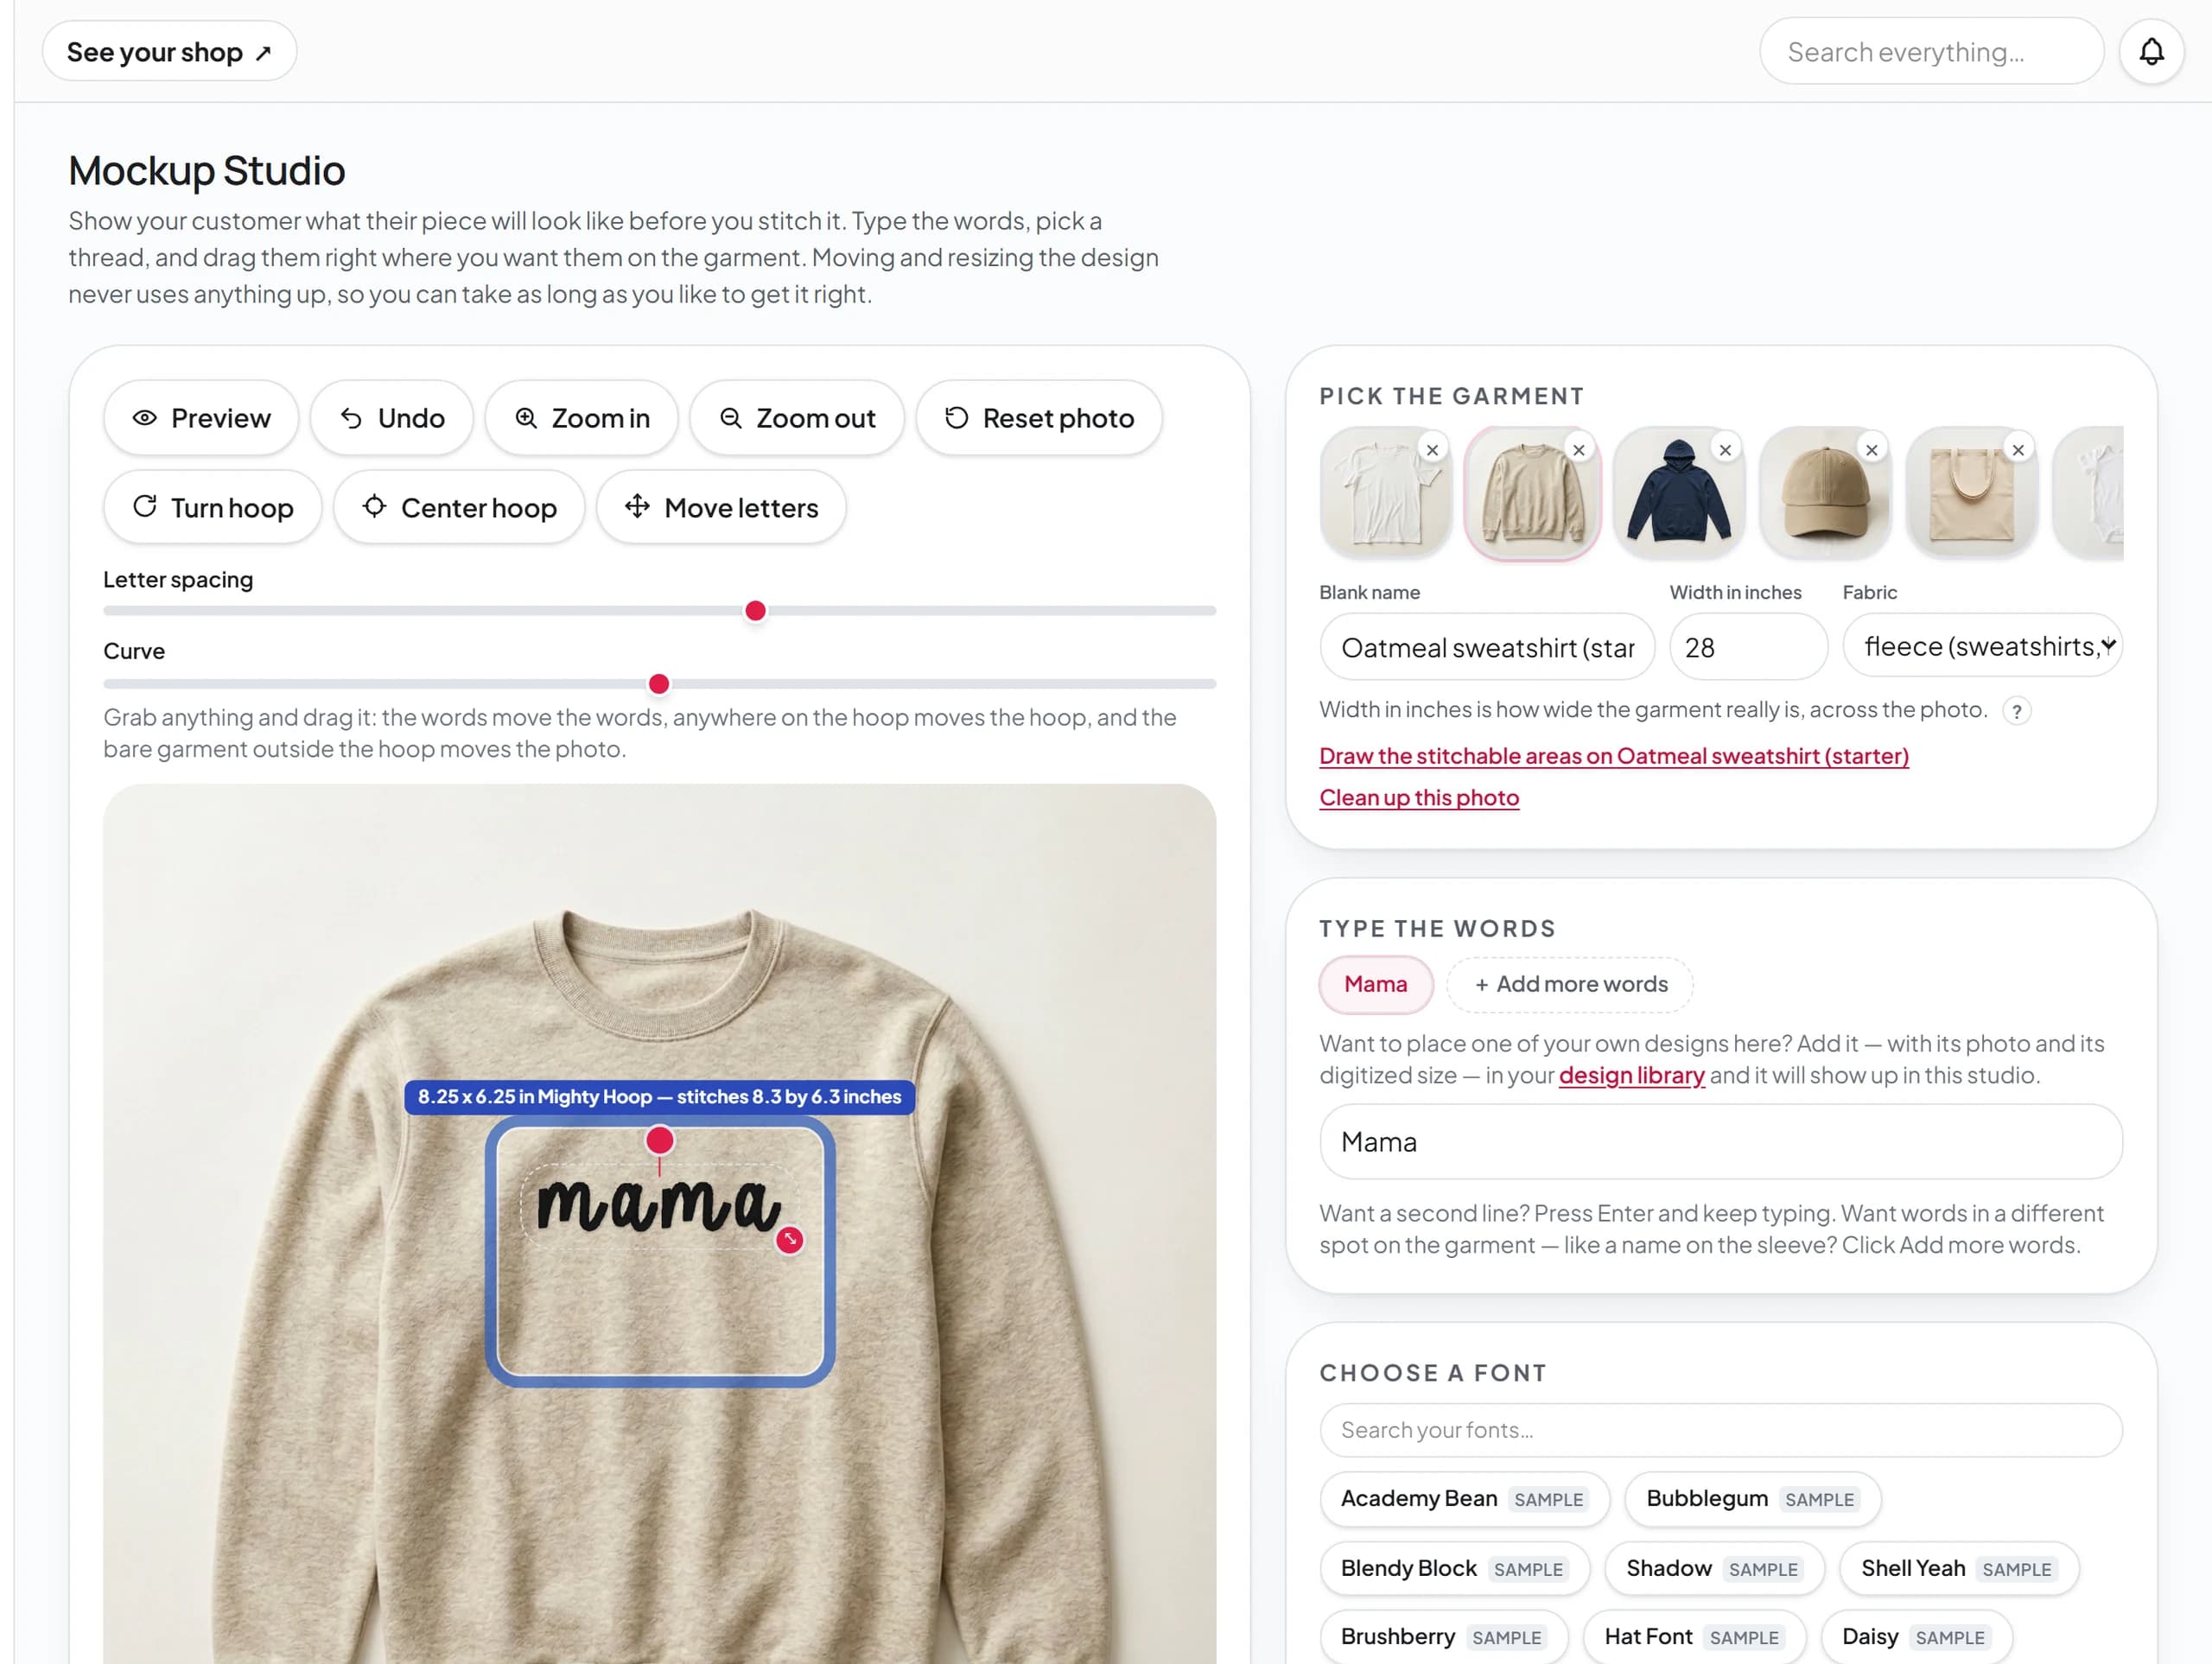
The Mockup Studio puts your customer's words on a photo of a real blank, drawn from real embroidery stitch files. The lettering is drawn from the real stitch files in your font library, the sizes are real measurements, and the hoop on screen is the hoop you own. What you send is a piece you can actually stitch.
Sizes throughout the studio are shown in inches by default, because that is how hoops are sold in the United States. If you work in millimeters, change it once on the Pricing & settings page, under the Policies & shop details tab, in the card called Inches or millimeters, and every size in the studio, your hoop list, and your design library switches over. You should never have to convert a hoop size in your head.
Add a blank
- 1Photograph the garment flat, straight on, and in good light. Fill the frame with the garment.
- 2In the studio, click Add a blank you stock, or simply drag the photo in from a folder and drop it anywhere on the page.
- 3The photo arrives with a guessed name and width. Fix both in the boxes underneath: give the blank a real name and type how much garment the photo shows across, in whichever unit your shop is set to. That one measurement is how the studio knows the real size of everything you place on it.
- 4If the garment came out sideways, click the ↻ button in the bottom corner of its picture in the row. Each click turns it a quarter turn. Its stitchable areas and its width measurement turn with it, so nothing has to be marked out or measured again.
Place the words
- 1Type the words. Press Enter to put the next words on a line underneath, like a name under a team name.
- 2Use Add more words to put a separate set of words somewhere else on the garment, each with its own font and thread color. Click any placed set to select it.
- 3Pick a font and a thread color. The thread swatches come from your own spool drawer when it has spools in it.
- 4Drag the words where you want them. Drag the bottom corner circle to resize, and the circle above the words to tilt. The arrow keys nudge in tiny steps, and holding Shift nudges in bigger steps.
- 5Use the Curve slider to arch the words, the way you would in your embroidery software.
Put a design on it too
Words are not the only thing you can place. Next to Add more words is a button called Add a design, and it opens your design library right there in the studio. Pick one and it drops into the middle of the hoop at the exact size it was digitized. A stitch file has one size, so the studio will not let you stretch a design bigger or smaller — that is what keeps the mockup honest. Drag it where you want it, and use the handle above it to tilt it. A design that has its stitch file attached is drawn from the real stitches, so only the stitching shows on the garment. A design with only a photo uses the photo, and for those a photo cropped tight to the stitching looks best, because a full product shot brings its whole background along with it.
If the design is not in your library yet — a customer just sent you a logo and you are already in the middle of a mockup — you do not have to go anywhere. Under the same picker is Add your first design, or Or add a new one if you already have some saved. Click Picture and choose the file, type a name in the Name it box, type how wide and how tall it stitches out, and click Add & place it. It goes onto the garment and saves to your design library at the same time, so it is waiting for you the next time you need it.
Tell the studio which hoops you own
Your hoops are set up inside the Mockup Studio, not on Supplies. Open Mockups in the left menu. On the right side of the studio is a card called "The hoop you are using". Click "Add or remove the hoops you own" and a list of common hoops opens, each with the area it actually stitches. Check every hoop you have, and each one saves the moment you check it.
If one of your hoops is not in the list, use the box under it, "Own a hoop that isn't in this list? Add it here." Type a name for it, the width and height it stitches from the hoop's packaging or your machine's manual, and click "Add this hoop". If it is a cap frame, check the cap-frame box so the studio pairs it with hat blanks.
Once your hoops are in, the studio draws the one you pick on the garment at its true size, your Products page warns you when a placement is bigger than any hoop you own, and the sizes follow the inches-or-millimeters setting on your Pricing & settings page.
The hoop is real
Pick the hoop you are actually using and it draws on the garment at its true stitching size, mounted the way that hoop really clips onto the machine. Grab it anywhere, on the ring itself or the open space inside it, to slide it around the garment the way you would hoop a real shirt, and use Turn the hoop to rotate it sideways. If the design does not fit the hoop, the studio says so and offers to shrink it to fit. The hoop and the words also snap to the garment's center line, which is the middle of the stitchable area you drew on that blank. On a tote with two straps, that is the middle between the straps, and on a sweatshirt it is the middle of the chest. If the center line ever looks wrong, redraw the stitchable area and it follows.
Check the spelling and send it
- 1Click Check spelling and send. The studio shows every set of words next to how it will actually stitch, and asks you to confirm the spelling is exactly right. This is the moment that catches a typo, because once it is stitched it cannot be fixed.
- 2Download the finished mockup picture to send over Facebook or Instagram, or email it to the customer right from the studio.
- 3Every mockup picture carries a small label saying it is a mockup, not a photo of the finished piece, so a customer never mistakes it for the finished item.
Put a mockup on a design or a group order
A finished mockup is not only for sending. Under the Save this mockup and Check spelling and send buttons is a line that reads "Use this mockup:" with two buttons. Both use the same picture Download gives you, label included.
"Add to a design" saves the mockup onto a design already in your library. Click it, then pick the design from the list (type part of its name to find it in a big library) and click "Use this". The studio says "Added to" and the design's name, with a link to open it. On that design's page the mockup shows in a card called "Mockup picture". The design's own artwork does not change, so it still places on a garment exactly as before. Adding a new mockup to the same design replaces the old one, and "Remove mockup picture" on the design's page takes it off.
"Use on a group order" puts the mockup on one of your group orders as the picture its members see first. Click it and pick the group order. The list shows the ones that are open or still a draft. Read every word on the mockup once more before you pick, because the whole group sees it. The studio then says the mockup is on that group order, with a link to your group orders. Picking a mockup here replaces any picture the group order already had.
Find a mockup again after the customer answers
Open Mockups in the left menu and scroll to "Mockups you have sent". Every mockup you have sent a customer is there, newest first, with its picture beside it. When you sent two options and the customer picked one, that row reads "Option A approved" or "Option B approved", so you can see which one they chose without opening anything.
Click "Approval sheet" on the row to see the whole thing written out: the words, the font they are set in, the thread, and the real stitched size. That is the page to open when you need to know which font a customer picked before you stitch it. Click "Open in the studio" instead and the mockup comes back exactly as you arranged it, ready to change and send again.
A mockup you made from an order also shows on that order, under "Mockups for this order". A mockup you made on its own, without an order, lives in the "Mockups you have sent" list.