Orders and customers
An order's life, from New to Done
6 minute read
Every order moves through the same five stops: New, Quoted, Paid, Making, and Done. You change the status with one click on the order page, and from Paid onward the customer's tracking page notes each step in plain words, so you do not have to send updates. An order that falls through can be marked Canceled without deleting it — and if the customer comes back around, moving it out of Canceled brings it back to life with everything still on it. The same goes for a Done order that turns out to need one more thing.
If those five words are not the words you use, change them. On the Orders page, the board lets you rename any of the five stops and add your own steps in between them — a Waiting on blanks column between Paid and Making, say, or a Ready for pickup column before Done. Each step you add hangs off one of the five core stops, so your board can look like your actual way of working without breaking the parts of Broidry that depend on knowing whether an order is paid or finished.
The five statuses
New means the order just arrived. Read it over and check that nothing is missing. If the customer skipped a detail, the order says so plainly.
Quoted means you have priced it. Build the quote on the order page, on its Quote & payment tab. Your rate card fills in the numbers, and you can adjust any line before sending. The customer gets a link where they accept the quote with one click.
Paid means the money part is settled and you are clear to stitch. Payments the customer reports show up on the order for you to confirm.
Making means it is on your machine or your table. The customer's tracking page updates so they stop wondering.
Done means it is finished. This unlocks the share tools: a social post about the finished piece, the review ask, and the package insert card. Marking an order Done also starts the review ask on its own: a week later, Broidry emails the buyer a link to leave a review (and puts the same line on their order page for buyers who left a phone number). If you send them the finished-piece photo from the order page, the ask goes the next day instead. If no review comes in, one reminder goes out a week after the ask, and that is the last note about it. An Ask for a review button on the order page sends it right away instead of waiting. Orders sold on Etsy or Square never get one, because their review belongs on that platform.
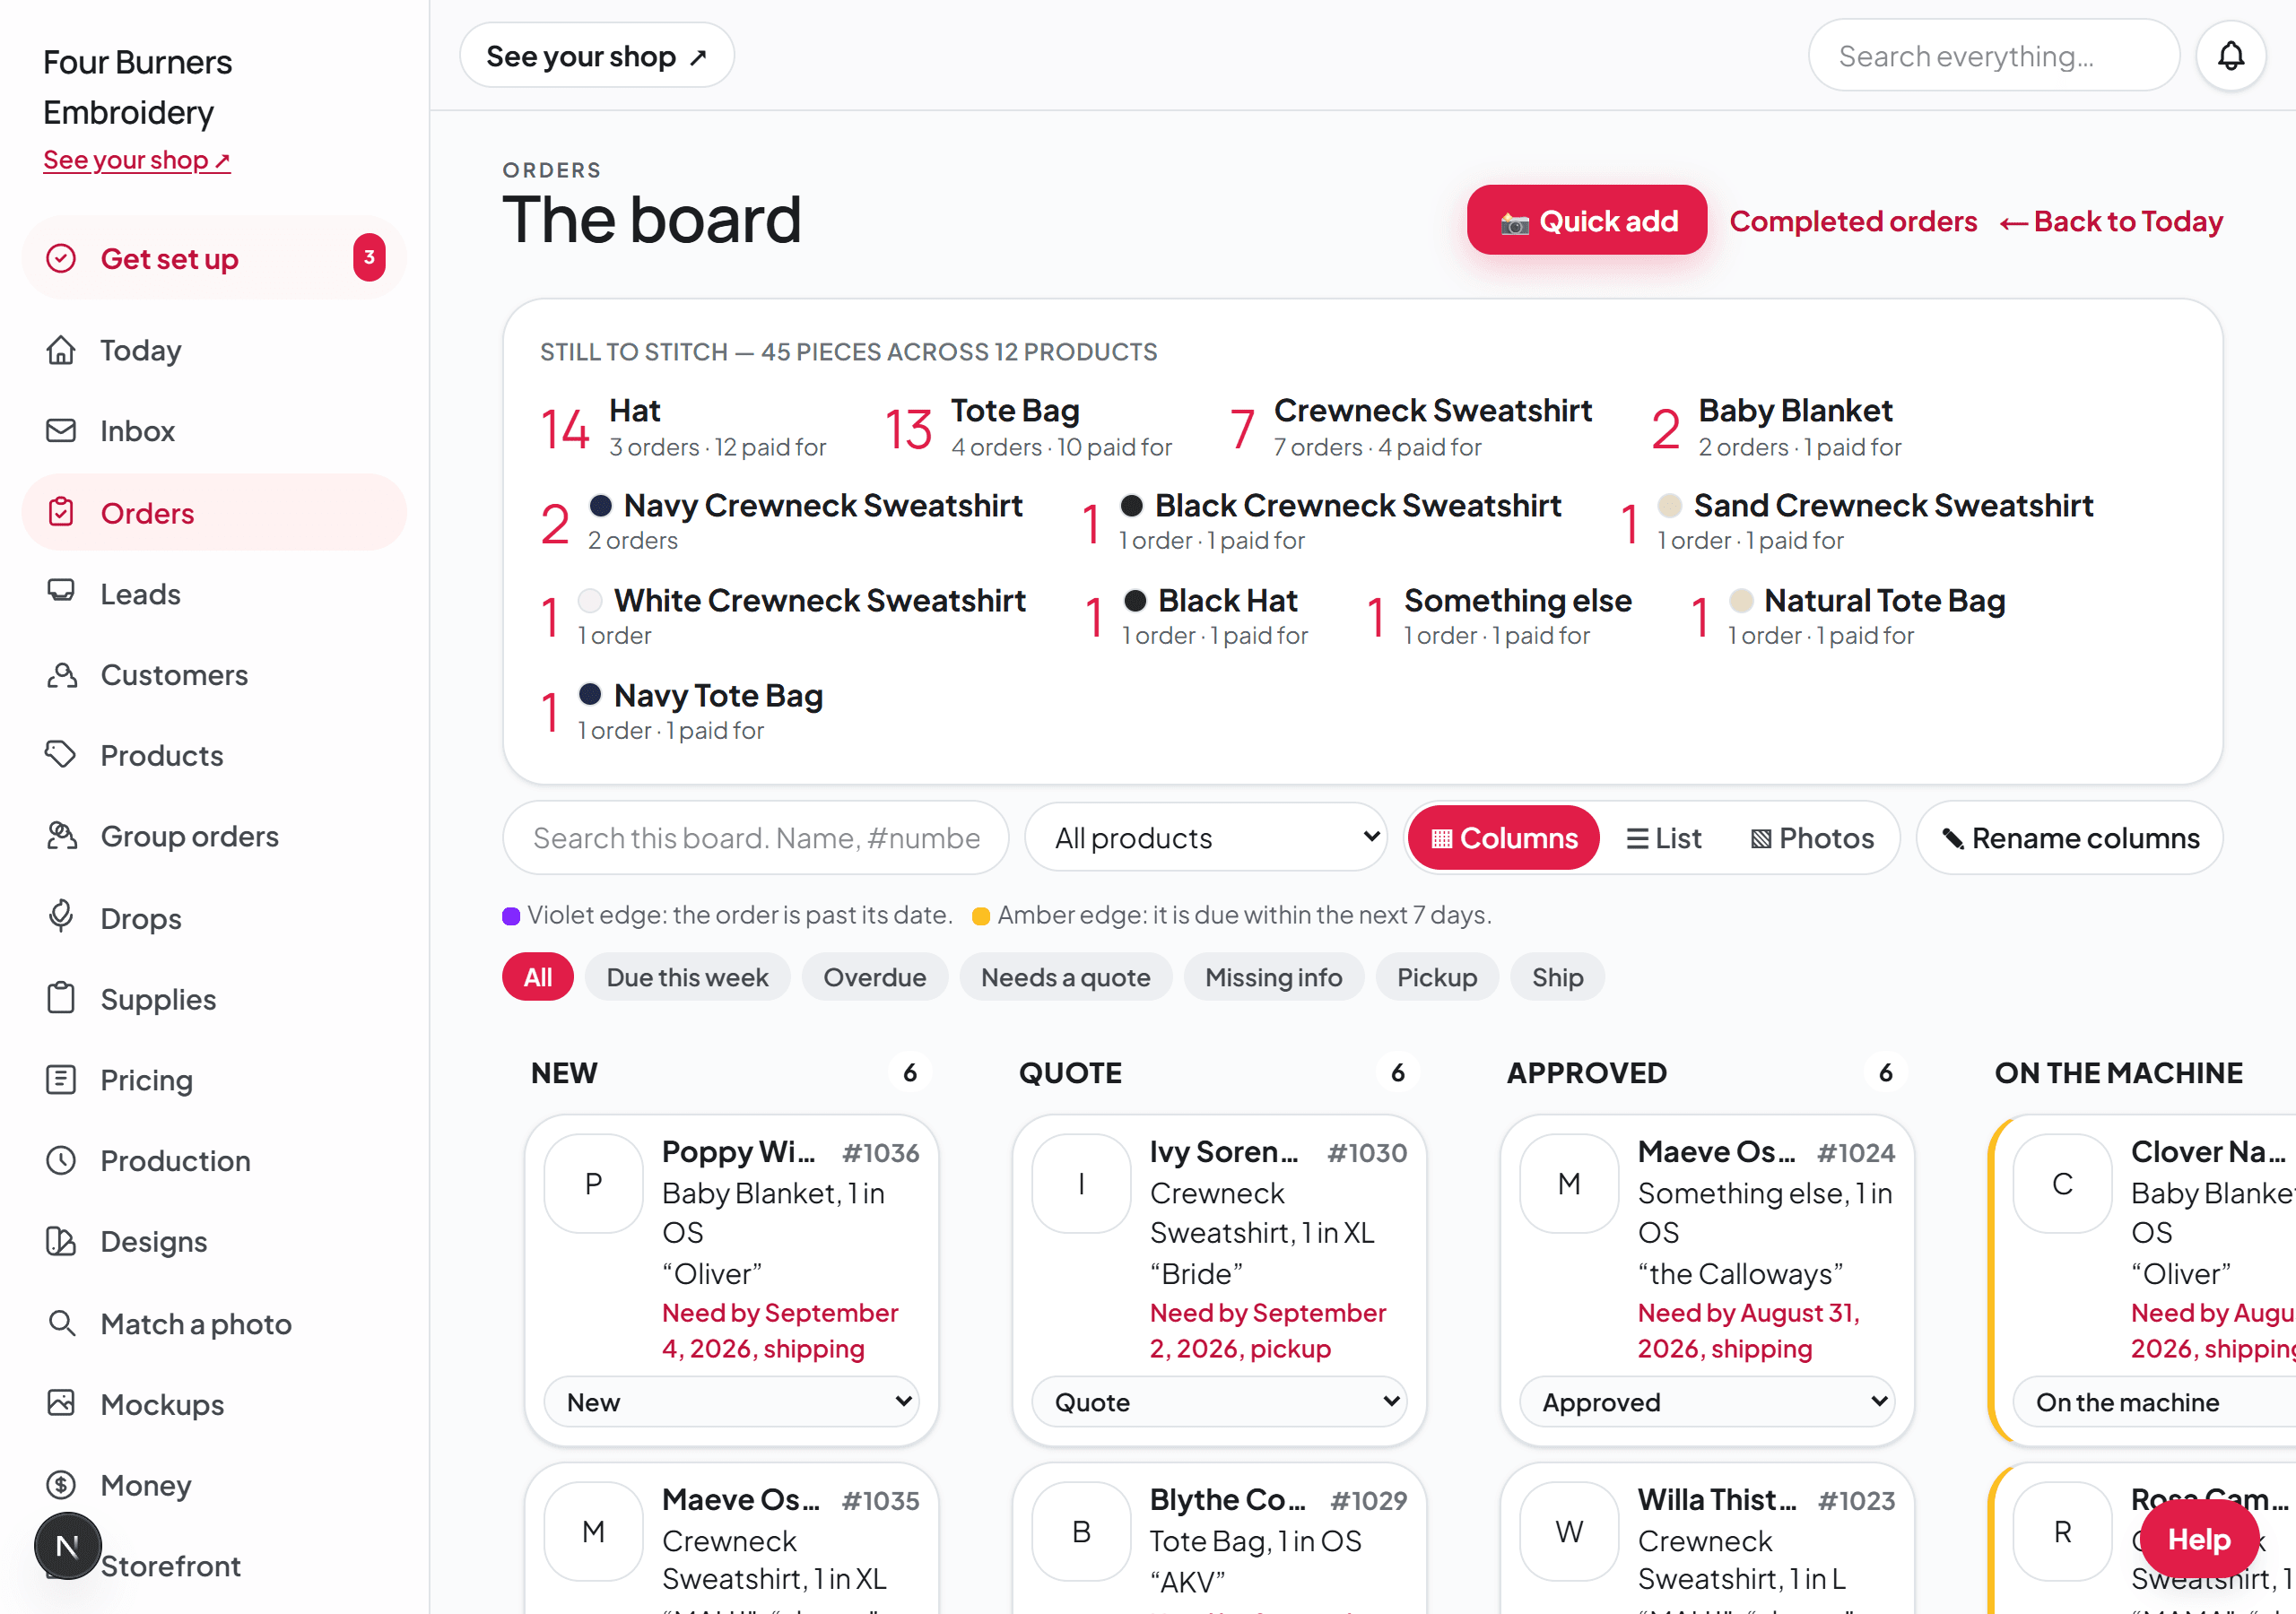
What each card on the board shows
A card is the order's work sheet in small. Under the customer's name and order number comes the garment color in bold, then the item, its size, and the appliqué fabric if the design uses one. The photo on the card is the product's listing photo, so the color in words is the one to trust. Then the customer's answers, one short line each, the answer in bold with your question after it: each word they are having stitched with its font and thread color, every answer to a choice list you attached to the product ("Shuler · Which lettering do you want?"), and the first line of any note they typed. A font or thread they left to you says "customer left it up to you" right there. A box they checked to say they understand something stays on the order page, since it is not a decision you act on. The list view shows the same answers on one line per order.
Under the answers is the date they need it by, pickup or shipping, whether the blank is on hand, and the menu that moves the order to another column. The idea is that you can walk from the board to the machine without opening the order. Open it when you need the quote, the messages, or the proof photo.
Finding your way around one order
The top of an order page is the same every time: the customer's name and contact, the status buttons, and one line with three facts. Need by is the date, with Change next to it. Pickup or shipping says how it gets to them. Money says what is still owed, and clicking it opens the payments.
Under that line are four tabs. The order opens on one card with everything the customer told you: the item, color, size, and appliqué fabric across the top, then each word being stitched with its font, how it sits, and its thread, then their answers to your questions and any note they typed. The approved picture sits beside it. Under that card are "Edit order details", the design, and the links you send them to choose or confirm their wording. Quote & payment has the quote, the payments, the balance request, and the print sheets. Messages has your conversation with them and the drafted updates. Making it has your steps, digitizing, the proof photo, mockups, shipping, materials cost, and remakes.
Archiving, canceling, and deleting the order are at the bottom of the page under every tab. Click a tab and the address changes with it, so a link you copy opens the same tab.
Orders with more than one item
When one order has more than one item, each item gets its own step once the order is paid: Paid, Waiting on supplies, Making, or Done. That covers an order you typed in with two or more items on its quote, an itemized quote your customer paid as one order, a Square or Etsy sale with more than one item on it, and a customer who bought more than one product in one checkout.
On the board it is still one card. Each item is listed on the card with a menu showing its step, so Shirt 1 can say Done while Shirt 2 says Waiting on supplies. Pick a new step from an item's menu to move just that item. The order page lists the same items, with the same menus, under what they ordered.
The card sits in the column of the item that is furthest behind. If any item is on Paid or Waiting on supplies, the order stays in your Paid column, and the card says which items are waiting on supplies. When every item is on Making or Done, the order moves to Making. It moves to Done only when every item is Done.
Your customer hears about it once. The email saying their order is finished goes out when the whole order is Done, not when each item is. Moving one item along emails nobody.
Moving the whole card works the way it always has. Drag it to a column, or pick a column from the menu at the bottom of the card, and every item on it moves to that step.
Several pieces of the same thing count as one item. If some of them will be ready before the rest, open the order and click "Split into separate items" next to that item. Type how many pieces go in the first item, for example 1 of 3 shirts, and click "Split it". The other 2 become a second item with its own step. "Put back together" joins them again.
An order with one item works exactly as before: one card, one step, and nothing new on it.
Seeing the board as a list and printing it
Above your orders are three buttons: Columns, List, and Photos. Columns is the board you drag cards along. List gives you one order per row, so twenty orders fit on one screen. Photos shows the same orders as big picture cards. Whichever you pick, that browser opens on it next time.
The Sort menu next to those buttons puts your orders in the order you want: due date, soonest first; most recently finished first; newest order first; oldest order first; or customer name, A to Z. On List and Photos it sorts the whole list. On Columns it sorts the cards inside each column, and the Done column shows the five orders you finished last unless the Done quick filter is on. That browser remembers the sort you picked.
The quick filter called Done lists every finished order on your board, with the order you finished last at the top. A finished order shows the day you finished it where the due date usually is. It shows them even when Done is switched off under "Pick which steps show". Pick another sort from the Sort menu while you are on Done and the list follows it. Each time you press Done, it starts again on the order you finished last. If you renamed your Done column, the button uses your name for it.
On List and Photos there is a button under the quick filters that says "Pick which steps show". Press it and you get a checkbox for every step you have, plus Canceled. Uncheck Done and finished orders come off the list, so what is left is only work you still have to do — that is why Done and Canceled start off. The plain words beside the button say which steps are switched off and how many orders that is holding back. The Columns board is not affected, so a finished order is still sitting there to drag around.
"🖨 Print this list" opens those same orders on a page built for paper. Every column is a checkbox: order number, customer name, what it is, sizes and how many, due date, which step it is on, pickup or ship, price and what is paid, their email or phone. Three more print on their own line under each order because they need the room — what it says, thread and font, and your notes on the order. Check "A box to check off" and the sheet becomes a checklist you carry to the machine. On the free plan a frozen order is not on the sheet. A line under the heading says how many were left off.
You choose which steps go on the sheet there too, what heading sits at the top, and what order the orders go in: any sort from the board's Sort menu, or step by step. The sheet starts in the order your board was sorted when you pressed "Print this list". "Print / save PDF" sends it to your printer, and your browser's print box can save it as a file instead if you want to email it to someone. Your boxes and your heading are remembered, so the next sheet comes out the same way.
Moving or messaging many orders at once
On List, every order has a checkbox at the start of its row. Check off the ones you want, or click "Check off all listed" to check off every order the list is showing. Search and the quick filters narrow the list first, so you can search a product name and then check off every order for that product.
"Move the orders you checked off to" moves every one of them to the column you pick, one after another, and counts as it goes. Each one follows the same rules as moving a single order. Moving orders to Done emails each customer that their order is finished, and the page asks you to confirm before it does.
"Message these customers" opens a box for one message. Write {name} where the customer's first name goes and {item} where what they ordered goes, and the box beside it shows what the first customer will read. When you send it, each customer gets the message on their own order page and by email, as if you had written it on that order, and their reply comes back to that order. A customer with no email on their order gets it on their order page only, and the page lists who that is. It reaches orders you are working on and orders you marked Done in the last 14 days, so a note that an order is ready for pickup works. Orders finished longer ago are left out, along with past orders you imported and never worked on, filed-away and canceled orders, and Etsy orders. The page lists them by number. To write past customers, use Email your list on the Marketing page, on the Shop plan.
A customer whose email bounced before, who marked Broidry email as spam, or who unsubscribed from your emails is not emailed. They still get the message on their order page. The page lists who they are, so you can reach them another way. A message to every buyer of a drop works the same way.
To have many customers check their spelling before you stitch, click "Start with a message asking them to confirm their wording" under the message box. The draft has {confirm} in it, which becomes each customer's own link to a page showing exactly the wording you have, with one button to confirm it. An order whose customer has confirmed shows "Wording confirmed" on its row in List. The quick filter "Wording not confirmed" lists every open order with wording that nobody has confirmed yet, so two days later you can check off every one of those and send it again. Anyone who already confirmed is left out of a message with {confirm} in it.
"Print packing slips" opens one slip per checked order in a new tab, each on its own page: your shop name, the order number, who it goes to and their address, and what is in the package with its size and wording. There are no prices on a slip. Click "Print / save PDF" to print them all.
"Download addresses" saves a spreadsheet of the checked orders with the name, street, city, state, ZIP, email, and item on each row, for a label service that takes a spreadsheet of addresses. Customers type their address into one box, so Broidry splits it into those columns. When it cannot find a street, city, state, and ZIP, it leaves those columns empty for that row and writes "Check this address" in the last column. The address exactly as the customer typed it is on every row.
When a second person has a login on your shop, you can split the work. "Give checked orders to" puts that person's name on every checked order, and their name shows on each row in List. Each of you gets a quick filter called "Mine" that lists only your own orders. On one order, the same choice is the "Who is making this" box under the status. Giving an order to someone changes nothing else about it and tells the customer nothing.
Orders you sold somewhere else
Not every order on your board was sold on Broidry. An Etsy sale that mirrored in, a piece someone bought at a craft fair, a phone order you typed up — they all sit on the board looking like work waiting to be done, and every normal way of finishing them emails the customer something. Days after the package arrived, "your order is finished!" is just confusing.
So the order page has two things for it. The first is where it was sold: click Sold on Etsy or off-platform? Mark it, and pick Etsy, In person, or Other. An order marked Etsy stops sending Broidry emails to that buyer entirely — Etsy already sends their receipt, their shipping notice, and their review ask, and two of everything is worse than one. The channel shows as a small orange chip on the board so you can tell at a glance where an order came from.
The second is the quiet close: I filled this one somewhere else. Say where it got filled and click Close it — no email. The order comes off your board and out of your stitch hours, the record still says where it went a year from now, and the customer hears nothing, because they already have their piece. If you close one by mistake, it undoes.
When you already know why an order is sitting
Sometimes an order is stalled and that is fine — the school pays after the work is done, the customer is out of town until the 12th, the deposit is coming with the blanks. You know the story, so a daily "they still haven't paid!" reminder is just noise.
On the board, every card has a small "Stop reminders" link. Click it and a box opens headed "What are you waiting on?". Type a short note there, or leave it blank, then click "Pause reminders". The order drops out of your morning summary and your follow-up list, the card dims and sinks below your active orders, and your note shows right on it so you remember the story at a glance.
You do not have to remember to turn the reminders back on. The moment anything really happens on the order — a payment arrives, you move it to Making, anything that changes its status — the pause ends by itself and Broidry starts watching it again. There is also a "Turn reminders back on" link on the card if you change your mind sooner. The customer is never messaged either way.
Changing the date an order is needed by
Open the order. Need by is the first thing in the line of facts under the customer's name, next to Pickup or shipping and Money. Next to the date is a small link that says Change, or Set a date when nobody has given one yet. Click it, pick the day, and click Save. That is the whole thing.
Your customer's tracking page shows the new date straight away, and a line saying the needed-by date changed goes into your message thread with them, so there is a record of it without you writing one. Your make list on the Production page re-sorts to the new date as well.
Everything else about the order changes the same way, from the “✏️ Edit order details” button near the top of the page: the color, the sizes, the wording and font, the thread, pickup or shipping, and your notes. The order keeps its number, its quote, and its whole conversation, so nothing is lost by editing instead of starting over.
Each stitched spot in that panel has a Font menu and a Thread color menu. The Font menu lists only your own shop's fonts: the ones you starred first, then fonts you uploaded, then the fonts built into Broidry. The Thread color menu lists your thread drawer first, then the built-in Madeira colors. Under the two menus, a preview shows the wording stitched in the font and thread you picked, so you can see a font before you choose it.
To change the item itself, click "Change the product or blank…" on the order. A saved quote is cleared so you can price the new item, and an order that was Quoted goes back to New.
The safety nets along the way
Before you stitch, the order page shows a picture of the exact wording the customer approved, stamped with their name and the moment they approved it. If the spelling was never confirmed, the order tells you, and you can send a one-click confirmation link.
If you change the wording, the font, or the thread with “✏️ Edit order details”, that picture is drawn again in what you picked, and its stamp says your shop updated it and when. Your customer sees the new picture on their quote and their order page.
If you upload a proof picture, the customer approves it from their link before you thread the machine, and the approval is stamped with the date and time.
Send your customer several photos in one message
The Messages tab on the order page is where you write to your customer. When your customer has written and you have not read it yet, the order opens on that tab and the tab says how many are new. To send pictures with your words, click "+ Add photos" under the box and pick every photo you want at once. You can also drag them onto the box from your computer. Each photo you picked shows by name above the Send button, with an ✕ to take one back out, and "+ Add more photos" adds the rest.
One message holds up to 10 photos. Your words and all the photos arrive together as one message on your customer's order page, and the email they get says how many photos are waiting there. Your customer can send you several photos the same way from their order page.
Print the order for the machine
Open the order and press "🖨️ Print the work sheet" in the buttons at the top right, under the status. There is a second link to the same sheet on the Quote & payment tab called "Work sheet with the proof photo", next to the quote sheet and the invoice. It opens a one-page sheet built to be printed and put in the bin with the blank: the proof picture large across the top, then what you are making — the blank, the color, the sizes — and one line per spot with the wording, the font, and the thread number. "Print / save PDF" sends it to your printer or saves it as a file.
Under the picture the sheet prints what the customer sent you: their logo or reference photo, and the screenshots of the conversation the order was built from. The proof at the top is your drawing of the job; these are what the customer actually asked for, so both are on the paper at the machine. An order with neither leaves the section off instead of printing an empty box.
There are no prices on it anywhere. That is on purpose, so you can hand the sheet to a helper without handing over what the job is worth. It does say whether the order is paid, because that is what decides if it gets stitched today. The customer quote sheet, next to it on the same page, is the one with the money on it.
Some lines say "Thread: customer left it up to you" or "Font: customer left it up to you". That is your buyer pressing the "Not sure? Let us pick" button in your shop instead of choosing, so the decision is yours. The printed sheet leaves a short line next to it to write down what you picked, and the same wording shows on the order page and the run sheet.
The order's picture shows those words in plain lettering, with a line under them saying your shop picks the font. A product with no font menu works the same way. When you pick the font with “✏️ Edit order details”, the picture is drawn again in the font you picked.
If you have not made a mockup for that order yet, the sheet still prints — it says so where the picture goes, instead of leaving a hole. Make one in the Mockup Studio and it shows up there.
To print it on a roll label printer, press "Print on a 4 × 6 label" at the top of the work sheet. The same sheet is laid out again for a 4 by 6 inch label, with the proof picture smaller and the customer's reference pictures left off, and the page size is set to 4 by 6 so your label printer takes it as one label. In the print window, pick the label printer and its 4 × 6 label size. A long order runs onto a second label. "Back to the full-page sheet" returns to the regular paper layout.
Print a care card for the box
Every order has its own care card: open the order, click the Quote & payment tab, and press "Care card (for the box)", next to the work sheet link. It opens a card with your shop name and the care instructions for that product type, sized to print and tuck in with the piece.
The words on the card are yours, and they are set once per product type, not once per order. Under the card on that page, press "Edit it", type your own care text, and press Save; every care card for that product type uses the new words from then on.
Scan the sheet when the piece is finished
There is a small square code at the bottom of the work sheet. Point your phone's camera at it and it opens that one order on a screen built for standing at the machine: the proof picture, what you are making, and one big button. Press it once to mark the order started, and once more when it comes off the machine. Your customer's tracking page updates by itself both times, so you never have to send the "it's ready" message.
You do not need an app for this. Every current iPhone and Android reads these codes with the camera that is already on the phone.
You do have to be signed in to Broidry on that phone. The first scan on a new phone shows you the sign-in screen, and after that it stays signed in. This is on purpose: the code is a plain page address and carries no way in with it, so the sheet is safe to leave in a bin, hand to a helper, or drop on the floor.
If the order is not paid yet, the screen says so instead of showing a button that would fail, and links you to the order to collect payment first.
Send your customer a photo of the finished piece
Once an order is Done, its Messages tab shows a card called "📸 The finished piece", and Machine mode shows the same card right after you finish a piece. Press "📸 Snap the finished piece" to open your phone's camera, or "or choose a photo you already took" to pick one you have. Broidry writes the "it's ready" message under the photo. Edit anything you like, then press the send button with your customer's name on it. If you attached the wrong photo, press "📸 Snap a different one" or "Pick a different photo" before you send, and the new photo replaces it. Nothing goes to your customer until you press send.
Link a hand-entered order to the listing it was for
An order you typed in yourself has no listing behind it, so it shows no product photo and, for a sold-as-shown piece, keeps asking for font and thread picks it never had. Open the order and press "Link this order to one of your listings". Pick the listing and press "Link it". The order then shows that listing's photo and title.
Every listing in your shop is in that list, with the ones that match this order's item type first. If you pick a listing of a different item type, the note above the list says so: the order becomes that item type too, and any saved quote is cleared so you price it again for the right item.
Put your own rows on the work sheet
The sheet carries your setup facts too, and you decide what they are. On any order, the "Your fields" card has "+ Add a field" — write a name like Needle, Stabilizer, Thread color, or Hoop, and it appears on every order from then on.
Order fields print on the work sheet as soon as you add them. There is no second setting to go turn on. If you filled the field in on that order, the sheet prints your answer; if you left it blank, it prints the name with a line next to it, so you can write it in standing at the machine. That is the part people were rebuilding in a Google Form.
Under each field is a checkbox that says "Print this on the work sheet". Uncheck it for anything that is office paperwork rather than setup — a school PO number, an invoice reference — and it stays on the order page without going out to the machine. Fields you keep on a customer never print here, because the work sheet is about one order.