Your shop page
Set up your shop page
4 minute read
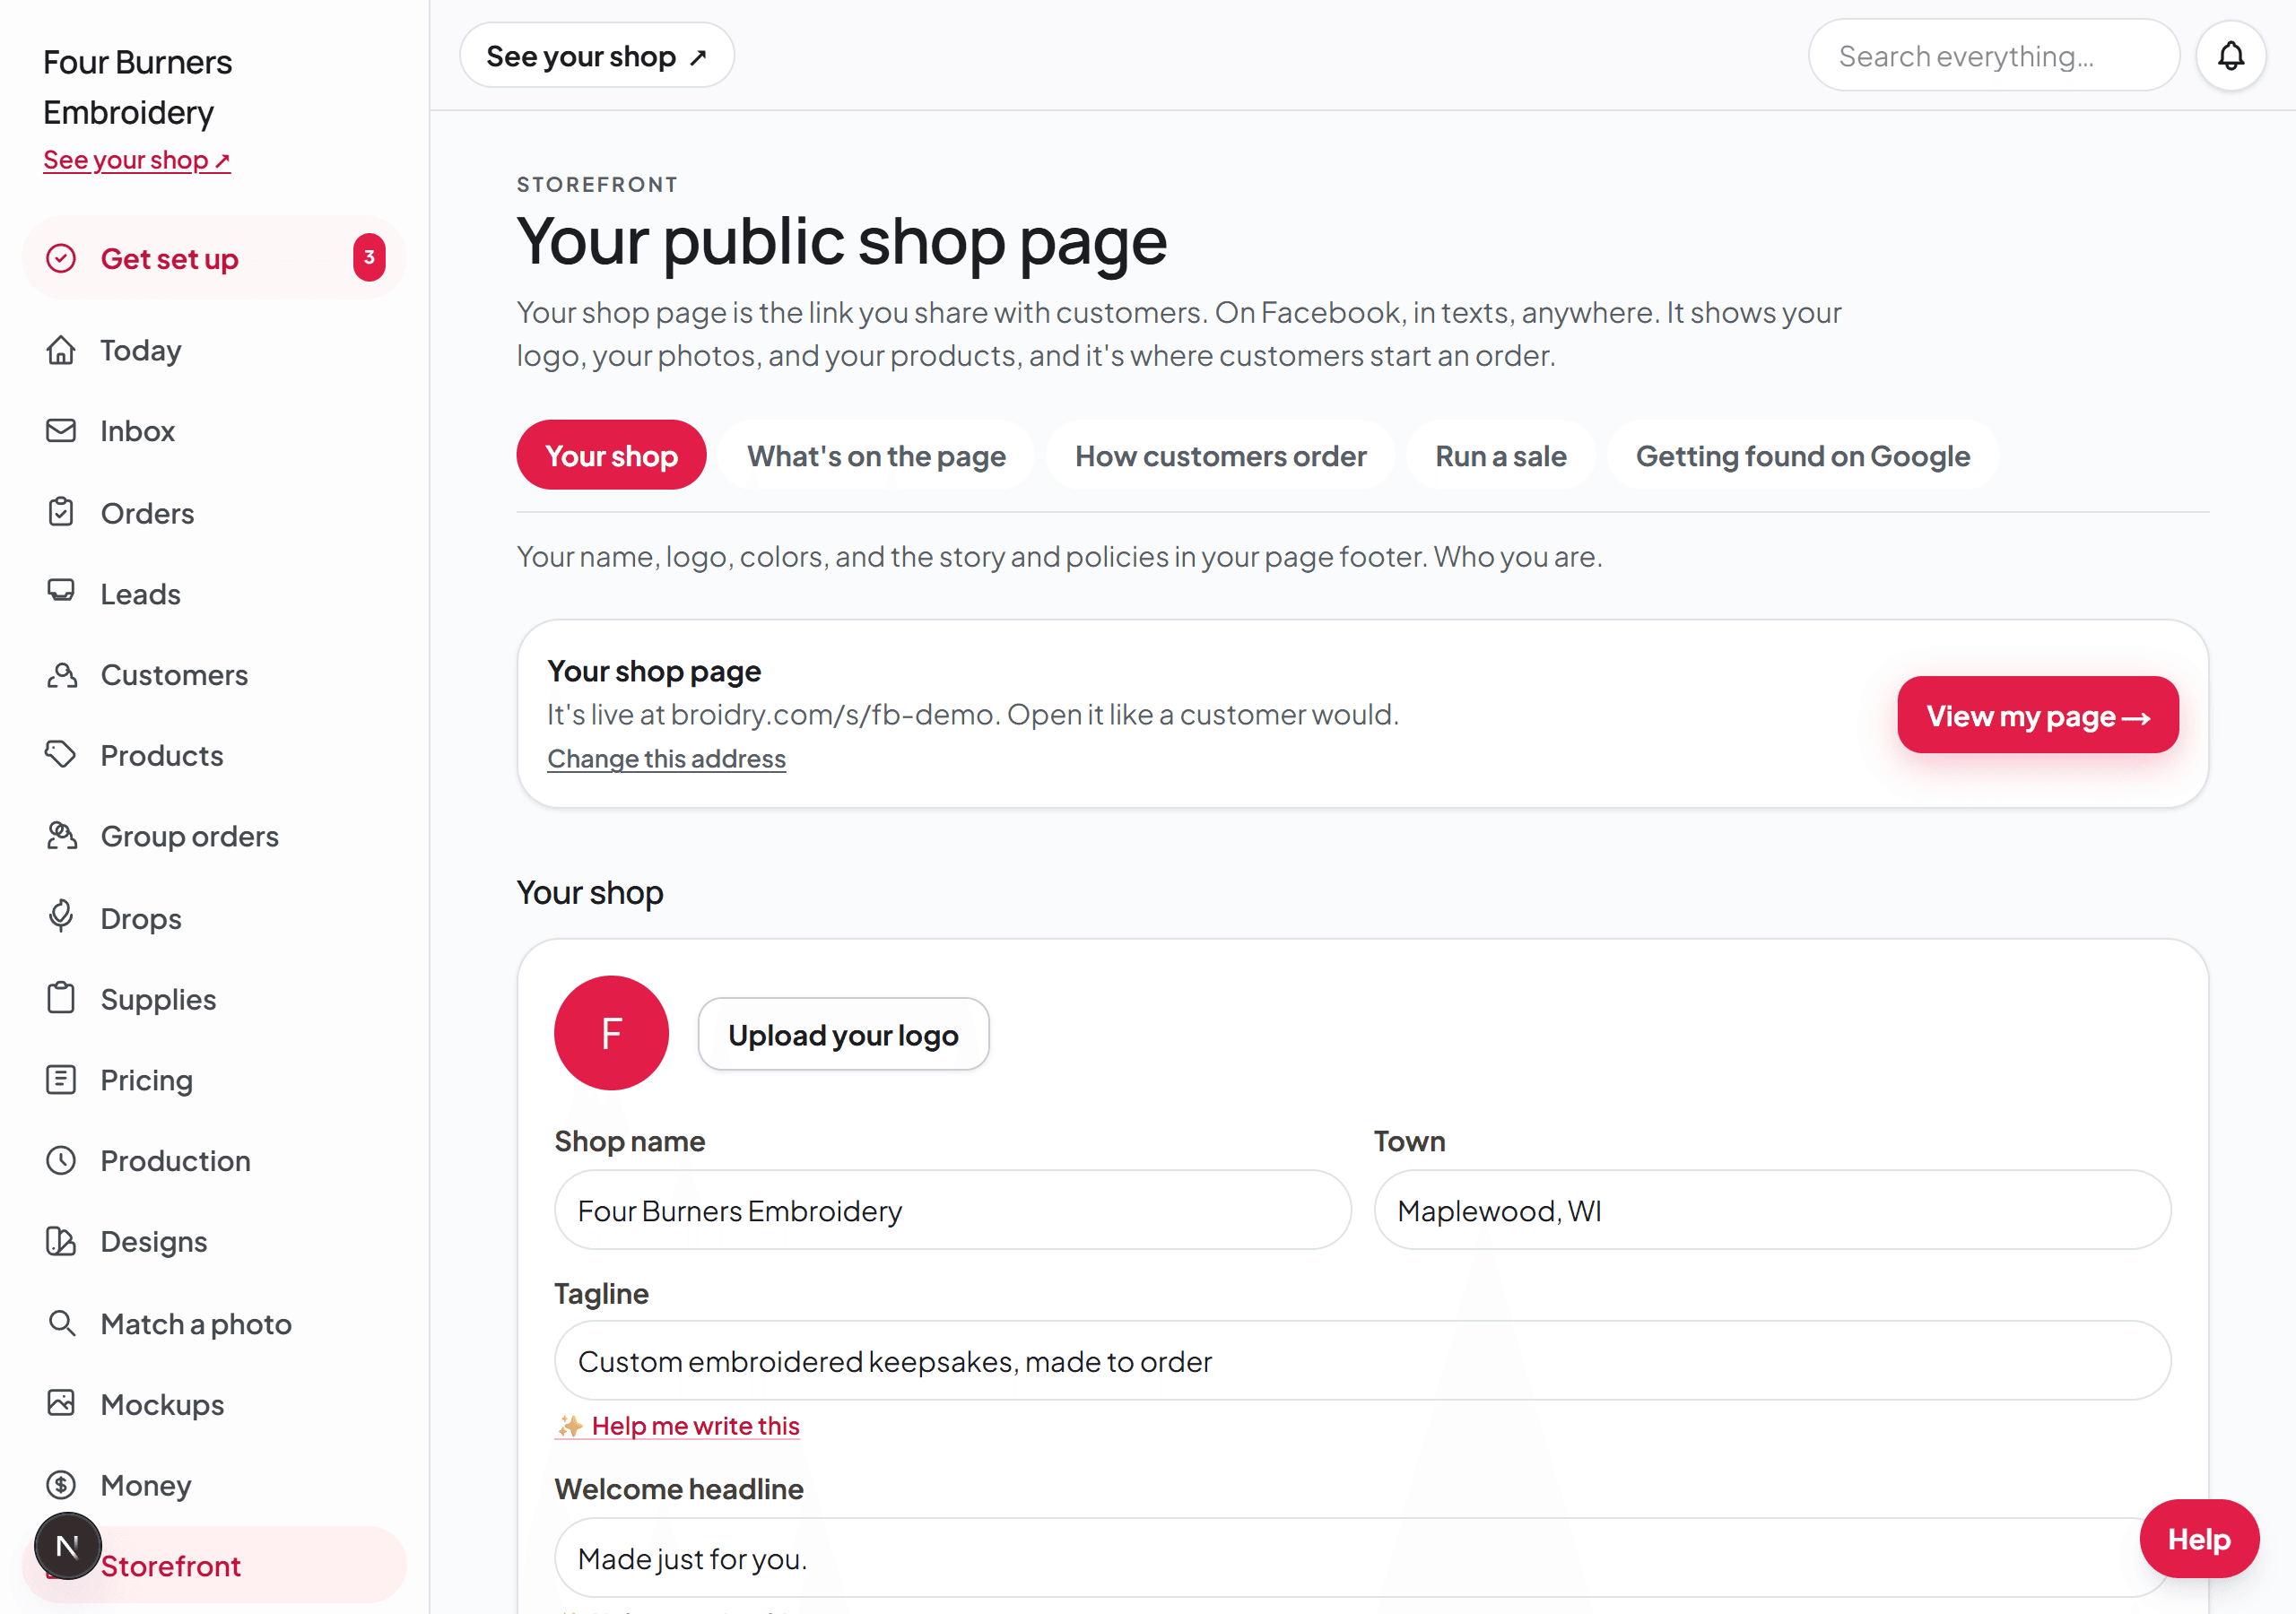
Your shop page is the one link you share everywhere. The Storefront page in your dashboard controls all of it, split into five tabs so nothing is buried.
The top of the page shows your shop's web address and whether it is open to customers, with Copy my link and View my page beside it. View my page opens your shop the way a customer sees it.
Keep your shop closed until you are ready
Your shop page goes live the day your shop is created. If you signed up to look around first, you can close the door while you work.
Open Storefront and stay on the Your shop tab. Under Shop details is a section called "Who can see your shop", with a switch beside the line "My shop isn't ready for customers yet". Turn it on and your shop page, your products, and your collections stop opening for anyone but you. Your shop also comes out of Google.
Nothing is deleted and nothing in your dashboard changes. Your orders, your quotes, your messages, and every link you have already built all carry on exactly as they were. While the shop is closed that card turns amber and the top of the Storefront page reads "Closed, only you can see it", so you cannot forget you are in that state. Turn the switch off and everything is back, at the same web address.
The five tabs
Your shop holds your name, your town, your welcome words, your logo, your trust badges, and the About and policies words in your page footer. Shops that show a real face and a real town win more orders from strangers.
Under Look and layout are two lines, each showing what is set now. Click Your look to pick the theme, fonts, corners, and your shop color. Click Page layout to choose which sections appear and in what order. Empty sections never show, so you cannot end up with a bare spot. Each opens on its own page, with a link back to Storefront at the top.
Under Web address are three more lines that open their own pages: Your web address (your broidry.com link), Your own domain (moving your shop to an address you own), and Show your shop on your own website (one switch and a snippet you paste into Shopify, Squarespace, or WordPress). When a customer pays from inside your website, the payment step opens in a full browser tab, because card checkout will not run inside another page.
What's on the page opens with Photos and testimonials. Add gallery photos and your Meet the maker photo right there. Banner photos and Testimonials are lines that show what is set now; click one to open it on its own page. Below that are the switches for what your page shows, the extra tabs, and the promises on your listing pages. The Jump to row at the top of the tab takes you straight to any of them.
Testimonials are kind words you collected somewhere else, like Facebook, texts, or Etsy. Click the Testimonials line on What's on the page, then drop in a screenshot or type one in, up to ten. They show in their own section called Shared by the shop and do not count toward your star rating. Reviews from buyers who order through your page show on their own; you can reply to those on the Marketing page, but you cannot edit or remove them.
The On-garment design preview switch lets a buyer who picks a design from your design library see it drawn on the garment, at its real stitched size, while they build their order. It is a drawn preview, so thread colors and fabric on screen can differ from the finished piece. With it off, buyers can still pick your designs, and the first picture on the garment they see is the approval mockup you send them.
Pickup and shipping, and your default for returns, sit on the How customers order tab. Local pickup is switched on when your shop is created, so your listing pages say "local pickup available" from your first day. Under that switch there is a box for where and when they pick up — "Porch pickup at 412 Maple St, any day after 4pm. Text me when you're on your way." Whatever you type there is what your buyer reads the moment they choose pickup, and again on the page that tracks their order. Fill it in and nobody has to message you to ask where you are. Leave it blank and they are told you will be in touch with the details, which is honest but costs you a message each time.
If you hand orders over in more than one place, like a market table on Saturdays and two towns the rest of the week, list them in the box called "Pickup spots, one per line" right under it: "Picking up at the market", "Pick up in Bedford", "Pick up in Plano". With two or more spots, a buyer who chooses pickup is asked "Where will you pick it up?" and presses one, on your product order form, in the cart, and on a drop. The spot they picked is written on the order under Pickup or shipping, on the card on your board, on the packing slip, and on the buyer's tracking page. One spot or none, and nobody is asked. You can change the spot on an order yourself from "Edit order details".
How customers order controls the order form itself. Its first section, "Order form questions", has a switch for each question the form asks: turn one off to match how you work, then click "Save how customers order". Not sure which to turn on? The "Take the quick quiz" link above the switches asks you in plain questions and sets the switches from your answers. One of them is "Straight or arched lettering". Leave it on and the wording step offers a buyer four shapes — Straight, Arched, Top arched and Bottom arched — and the preview draws the curve they picked, so an owner who stitches more than one arch can let a buyer say which one. Turn it off if your fonts or software do not curve text, and the form stops asking: all three curves go away and every word stitches straight across. To stop asking on one product only, open that product and turn off "Let buyers curve the words" in its Item options. Your other products keep the question. Which fonts a buyer can pick is set with your fonts on the Designs page, under Fonts. The same tab holds "Waiver and order terms": the garment waiver, what buyers read when they mail you their own item, the box for items you cut up, and your order terms. Each is a row you click to open, and a row says On when it has wording in it, so you can see which ones are in use without opening them.
Run a sale has three parts. Shop-wide sale is a switch and a percent off, on the Shop plan and up. Banner across the top of your page is the one box for the words in the bar at the top of your shop page; with a sale on and the box blank, the bar says how much is off. Seasonal color gives your page a season's color until a date you pick, then it goes back to your own color. Picking one of the starter colors fills the banner box with a matching deadline line if the box is empty, and you can change the words before you save.
Getting found on Google holds the basics that help your page show up in search.
Why your shop isn't showing on Google yet
Open Storefront and choose the Getting found on Google tab. The card at the top, "Can Google find your shop?", tells you whether your shop page is open to Google and how many of your products Broidry has put on the list of pages it gives Google.
If the card says your shop is closed, Google is told to leave it out. Turn off "My shop isn't ready for customers yet" on the Your shop tab to open it.
If the card says yes, nothing on Broidry is keeping Google out. Google adds new pages on its own schedule, and for a brand-new shop that can take several days to a few weeks. Other pages that link to your shop help Google find it sooner, like your Facebook page, your Instagram bio, or your Google Business Profile.
The link on that card, "See which of your pages Google has so far", opens a Google search that shows only your shop's pages. When it shows your pages, Google has added them. If your shop answers at your own domain, the search looks at your own address, because that is the address Google is told to list.
Under the card, the Search title and Search description boxes choose the words Google shows for your shop. Leave them blank and Broidry writes them from your shop name and the words already on your shop page.
Proving to Google that your shop page is yours
Two different Google things get called "verifying," and they work differently. A Google Business Profile is the listing with your hours and reviews that shows up on Maps. Google verifies that itself, by mailing a postcard, calling, or asking for a short video of your workspace. Your Broidry address goes in its Website box, and nothing on your shop page has to change for it.
Google Search Console is the other one: Google's free tool that shows which searches bring people to a page. To add your shop page there, Google asks you to prove the page is yours, and one of the ways it offers is an "HTML tag," a line that starts with <meta name="google-site-verification". Copy that whole line.
Open Storefront and choose the Getting found on Google tab. At the bottom of the tab, under Google Search Console, is a box called Verification code. Paste the line there, press Save code, then go back to Google and press Verify. Broidry keeps only the code and puts the tag on your shop page for you, so it does not matter whether you pasted the whole line or just the code.
When you add the page in Search Console, use the URL prefix choice and type your full shop address, https://broidry.com/s/ followed by your shop's name in the address, exactly as it appears at the top of your Storefront page. If your shop answers at your own domain, type that address instead, like https://yourname.com/, because that is the address Google lists for your shop.
Change your web address
Your web address is built from the shop name you typed when you signed up. Most new shops settle on their real business name a little later than that, so you can move it.
Open Storefront in your dashboard and stay on the Your shop tab. Under Web address, click the line called Your web address. It opens its own page with your address in a box. Type the name you want and press Save web address.
Spaces and capital letters turn into dashes and lowercase when you save, so Sunshine and Bliss Embroidery becomes sunshine-and-bliss-embroidery. If another shop is already using the address you typed, Broidry says so instead of saving it.
Your old address keeps working, and it always will. A link you already texted a customer, a card you handed someone at a fair, and a QR code you already printed all still open your shop.
How customers find one product
Three things on your shop page get a customer to the right product without scrolling your whole catalog.
Your shop page shows your first 12 products, with a Show all button under them that opens the rest. That keeps your reviews, your custom order box, and your group orders close to the top on a phone. They show in the order you drag them into on the Products page, so drag the ones you sell most to the top.
The first is your shop categories. A category is a heading you make yourself for the menu on your shop page, and it can have subcategories under it. A shop that makes spirit wear might have a category called Schools & Teams with a subcategory for each school, so a parent clicks Schools & Teams, then their school, and sees only that school's pieces. On a computer the menu runs down the left: All items, then your categories with their subcategories indented under them, then your item types under the heading Shop by item. On a phone the menu is a row of buttons across the top, and choosing a category brings up a second row with its subcategories.
Make your categories on the Products page, in the card called Shop categories, or right from a product. On the Products page, type a name and choose Add category, then choose Add a subcategory under it for each one you want. The arrows beside each name move it up or down, and the menu on your shop page follows that order. Rename and Delete sit on the same line. Deleting a category never deletes products, it only takes them out of that category.
To put a product in a category, open the product and check off the category under Shop categories. A product in a subcategory also shows under the category above it, so a product in Kohler shows under Schools & Teams without checking off both. If the category you need is not there yet, make it from the product. Press + Add a subcategory at the end of a category's row, or + Add a new category under them all, type the name, and press Add. It is added to your shop's menu and checked off for that product in one step. To put many products in at once, choose Change or delete several on your Products page, pick the products, and choose the category under Add to a category.
A category only shows on your shop page once at least one product is in it. Each one has its own web address: choose Copy link next to it on the Products page, and the link opens your shop page with that category already chosen. It is the link to post in a school's parent group or a team's group chat. Renaming a category keeps its link the same, so a link you already posted keeps working.
The second is your tags. Once you have a category with a product in it, your shop page menu shows your categories and no longer lists your tags, so the menu stays short. Until then, every tag you put on a product becomes a group a customer can click on your shop page. On a computer your tags are listed down the left under the heading Collections, next to the sections Broidry works out from item type, with a count beside each one. On a phone they run across the top as a row of eight, which are the ones you have used on the most products, and the rest sit behind a button that says how many more there are.
Tags are the part of this you name yourself. The sections above them are your item types, so they say Sweatshirts and Hoodies and Totes & bags and nothing else. A tag can say anything: Christmas, Teacher gifts, Game day, Baby. Put the same tag on several products and it becomes a collection, whatever those products are made from.
You do not have to put a tag on one product at a time. Pick the products on your Products page, choose Change or delete several, and type the tag under Tag them as a group. It goes on all of them at once and keeps the tags each product already had. The box next to it takes a tag back off the ones you picked, which is how a seasonal collection comes down in January.
Tag lists go messy over time, in every tool that has them. You end up with Christmas and christmas gifts and embroidered christmas, all meaning one thing, and your shop page shows three headings where there should be one. Your Products page has a card called Your collections that lists every tag you use and how many products carry it. Rename a tag there and it changes on every product at once. Rename one to match another and the two become a single collection. Remove one and it comes off everything, leaving the products themselves exactly as they are.
The card also tells you how many of your tags are on a single product each. A tag one product uses is not a collection yet, and those are the ones worth folding into a tag you already use. Broidry never keeps a tag you have stopped using, so there is nothing to sweep up afterward — the moment no product carries a word, it stops showing on your shop page.
The third is the search box. It sits above your products once your shop has more than twelve of them, and it looks at every product name and every tag. Two words narrow it further than one, and the order does not matter. A search is its own web address, so a customer can send it to someone or come back to it later.
Both of these run on your own words. A product named Senior class of 2026 and tagged sweatshirt is found by someone searching senior, or sweatshirt, or both. Naming your products the way your customers say them out loud is the whole trick.
Make it look like you
Pick a theme, or let the setup helper suggest one from how you describe your shop. The Match my logo's color button pulls your logo's main color into the page. The theme carries your colors and type through every page a customer sees, including their order form and tracking pages. Add a meet-the-maker photo so customers can see the person making their piece.
Your link and QR code for Instagram and Facebook
Instagram and Facebook each allow one link in your bio. Broidry gives you one page built for that spot: broidry.com/s/your-shop/link. It shows your logo and your shop's name, then big buttons: Order, which opens your order form; See the shop; Ask a question, which opens the question box on your shop page; Text us, when your texting number is approved; and your Instagram and Facebook pages when you have typed them in under Your shop. A button only appears when the thing behind it works for your shop, so a customer never presses one that goes nowhere.
The address is on the Storefront page, on the Your shop tab, in the box called Your one link for Instagram and Facebook. Press Copy, then paste it as the link in your Instagram bio and your Facebook page. Open it shows you the page the way a customer on a phone sees it, in your shop's colors.
The same box has Download QR code. It saves a PNG picture that opens your link page when someone points a phone camera at it. Print it on hang tags, business cards, and a sign at your market table, so a customer who likes a piece can order from you on the spot.
The promise your listing pages make
Under the order button on every listing page, Broidry can show one short promise to your buyer: "You approve every detail before it's made." It is a switch, not fixed text, and it lives under What's on the page, in the box called What your listing pages promise. Leave it on if you send a proof or confirm the wording before you start. Turn it off if you work straight from the order, so you are not promising a step you do not actually do.
Broidry never writes a line about how your work is made. Your pages do not say "real embroidery" or "not printed" unless you say it yourself. If you want your buyers to read that, type it as one of your trust badges under Your shop, in the Trust badges box. Your badges show on every one of your listing pages, in your own words.
If you also work by hand
In that same box there is a second switch: "I do some of my work by hand." It is off by default, and while it is off, anything Broidry writes for you is checked so it can never describe machine embroidery as hand embroidered or handmade. That check exists to protect you, because calling machine work handmade is the kind of claim that costs a shop its reputation.
If you genuinely do hand embroidery, hand-finishing, or sell handmade pieces alongside your machine work, turn it on. Broidry then stops rewriting those words out of your own copy and keeps your wording as you typed it. It still will not invent a hand-work claim you did not make — turning the switch on only stops the correction, it does not start adding the words for you.